上一篇我总结下了Docker 的基本概念,这一篇我来重点总结下目前主流的镜像存储的方案。
Registry
总体上来说,我这里的方案是启动一个仅支持 http 的 registry 服务,然后在前面放一个 nginx 来终结 https 请求和用户验证(basic auth 或者通过第三方模块来集成 LDAP)。
启动 registry
docker run -d -p 5000:5000 --restart=always --name registry \
    -v /data:/registry/var/lib/registry registry:2
编译安装 nginx
mkdir /opt/source
git clone https://github.com/kvspb/nginx-auth-ldap.git
git clone https://github.com/openresty/headers-more-nginx-module.git
wget -O - | tar xzf - -C /opt/source && \
./configure --prefix=/opt/nginx-1.11.8 --add-module=/opt/source/nginx-auth-ldap --add-module=/opt/source/headers-more-nginx-module --with-http_ssl_module && \
make && make install
ln -s /opt/nginx-1.11.8 /opt/nginx
配置 nginx
vim /opt/nginx/conf/registry.conf 内容如下:
ldap_server test1 {
    url ldaps://dir.xdays.me/ou=people,dc=everstring,dc=com?uid?sub?(objectclass=posixAccount);
    require valid_user;
}

## Set a variable to help us decide if we need to add the
## 'Docker-Distribution-Api-Version' header.
## The registry always sets this header.
## In the case of nginx performing auth, the header will be unset
## since nginx is auth-ing before proxying.
map $upstream_http_docker_distribution_api_version $docker_distribution_api_version {
  'registry/2.0' '';
  default registry/2.0;
}

server {
  listen 443 ssl;
  server_name registry.xdays.me;

  # SSL
  ssl_certificate /opt/nginx/conf/certs.d/xdays.me.crt;
  ssl_certificate_key /opt/nginx/conf/certs.d/xdays.me.key;

  # Recommendations from https://raymii.org/s/tutorials/Strong_SSL_Security_On_nginx.html
  ssl_protocols TLSv1.1 TLSv1.2;
  ssl_ciphers 'EECDH+AESGCM:EDH+AESGCM:AES256+EECDH:AES256+EDH';
  ssl_prefer_server_ciphers on;
  ssl_session_cache shared:SSL:10m;

  # disable any limits to avoid HTTP 413 for large image uploads
  client_max_body_size 0;

  # required to avoid HTTP 411: see Issue #1486 (https://github.com/docker/docker/issues/1486)
  chunked_transfer_encoding on;

  location /v2/ {
    # Do not allow connections from docker 1.5 and earlier
    # docker pre-1.6.0 did not properly set the user agent on ping, catch "Go *" user agents
    if ($http_user_agent ~ "^(docker\/1\.(3|4|5(?!\.[0-9]-dev))|Go ).*$" ) {
      return 404;
    }

    # To add basic authentication to v2 use auth_basic setting.
    auth_ldap "Private Registry";
    auth_ldap_servers test1;

    ## If  is empty, the header will not be added.
    ## See the map directive above where this variable is defined.
    add_header 'Docker-Distribution-Api-Version' $docker_distribution_api_version always;

    proxy_pass                          http://127.0.0.1:5000;
    proxy_set_header  Host              $http_host;   # required for docker client's sake
    proxy_set_header  X-Real-IP         $remote_addr; # pass on real client's IP
    proxy_set_header  X-Forwarded-For   $proxy_add_x_forwarded_for;
    proxy_set_header  X-Forwarded-Proto $scheme;
    proxy_read_timeout                  900;
  }
}
准备证书的环境我这里就略过了。
然后启动 nginx
/opt/nginx/sbin/nginxOK,官方的 registry 的安装配置就介绍到这里了。
Nexus
Nexus 起初是 maven 仓库服务软件,后来 Sonatype 在 maven 基础上添加了基本上目前主流语言的包管理功能,包括 pypi, rubygems,npm 等,其中一个闪亮的功能是加入了 docker registry 的支持。简单来说,使用 Nexus 的优势在于:
- 你可以用一套程序来处理所有对包管理的需求,便于维护
- Nexus 有原生的 LDAP 支持,便于管理用户
启动 Nexus
基于 Nexus 的方案和上一节的 registry 比较类似,启动仅处理 http 的 Nexus 服务,然后前面放一个 nginx 来处理 https 请求。安装配置 Nexus 比较简单,只需要启动 Nexus 容器即可。
mkdir -p /data/nexus-data && chown -R 200 /data/nexus-data
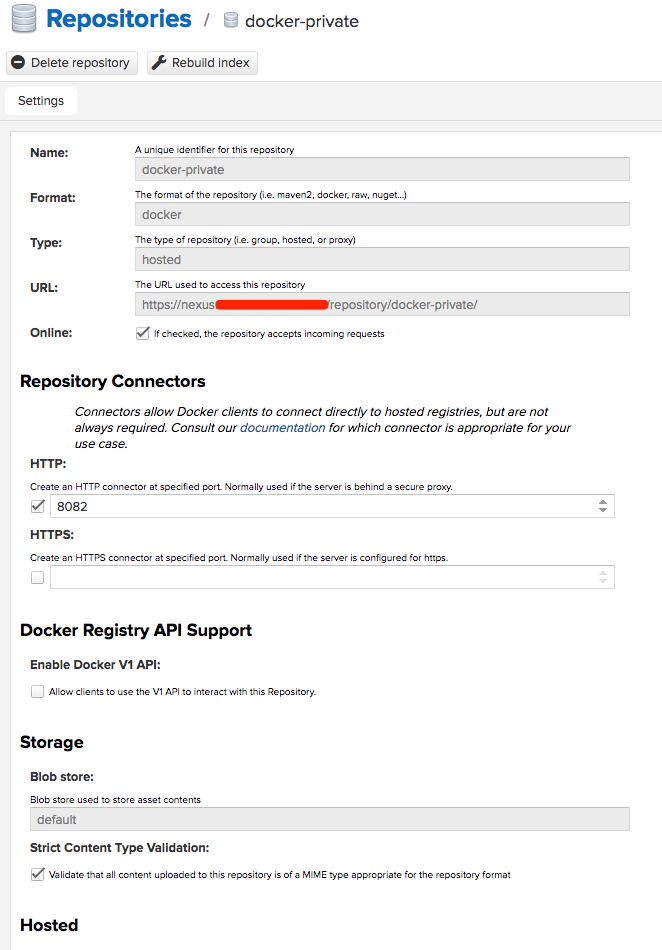
docker run -d --net host --name nexus -v /data/nexus-data:/nexus-data sonatype/nexus3然后我们新建一个类型为 docker hostsed 的 repository,具体配置如下图所示:
注意: 由于 Nexus 自己不处理 https 请求,它要暴露给 nginx 一个端口让 nginx 将对 registry 的请求转发过来。
配置 nginx
这里对 nginx 没有特殊要求,所以可以用系统自带的 nginx 版本,相关的配置如下:
client_max_body_size 0;
proxy_read_timeout 900s;
proxy_send_timeout 900s;
proxy_set_header Host      $host;
proxy_set_header X-Real-IP $remote_addr;
proxy_set_header X-Forwarded-Proto $scheme;

server {
    listen       443 ssl;
    server_name registry.xdays.me;

    ssl_certificate /etc/nginx/certs.d/xdays.me.crt;
    ssl_certificate_key /etc/nginx/certs.d/xdays.me.key;
    ssl_protocols       TLSv1 TLSv1.1 TLSv1.2;
    ssl_ciphers 'HIGH:!aNULL:!eNULL:!EXPORT:!DES:!RC4:!MD5:!PSK:!aECDH:!DHE';
    ssl_prefer_server_ciphers on;

    location / {
        proxy_pass http://127.0.0.1:8082;
    }
}

server {
    listen       443 ssl;
    server_name nexus.xdays.me pypi.xdays.me;

    ssl_certificate /etc/nginx/certs.d/xdays.me.crt;
    ssl_certificate_key /etc/nginx/certs.d/xdays.me.key;
    ssl_protocols       TLSv1 TLSv1.1 TLSv1.2;
    ssl_ciphers 'HIGH:!aNULL:!eNULL:!EXPORT:!DES:!RC4:!MD5:!PSK:!aECDH:!DHE';
    ssl_prefer_server_ciphers on;

    location / {
        proxy_pass http://127.0.0.1:8081;
    }
}

server {
    listen         80;
    server_name nexus.xdays.me;
    return         301 https://$server_name$request_uri;
}
启动 nginx
systemctl start nginxHarbor
Harbor 是 VMWare 开源的一个号称及企业级的镜像管理系统,是基于我们第一部分提到的官方的 registry 开发的,主要利用了官方 registry 的 auth 和 notification 的 hook,然后自己开发了一套 web 界面以及跑其他任务的 jobservice。Harbor 的优势在于:
- 易用的 web 管理界面
- 可以基于 project 管理镜像
- 支持 LDAP 管理用户认证
- 支持多系统之间的数据同步,这对于搭建多地 registry 镜像很有用
安装配置
Harbor 的安装配置也叫容易,推荐使用 compose file 来启动 Harbor。
首先,根据网络,可以选择下载在线和离线安装包(国情),我这里下载在线安装包:
wget -O - https://github.com/vmware/harbor/releases/download/0.5.0/harbor-online-installer-0.5.0.tgz | tar xzf - -C /opt/source/然后编辑配置文件 vim harbor.cfg 修改如下配置项:
hostname = reg.xdays.me
ui_url_protocol = https
customize_crt = off
ssl_cert = /data/cert/server.crt
ssl_cert_key = /data/cert/server.key注意,我这里用的自己的证书,这样能避免官方提到的—insecure-registry 配置,但前提是你需要有一个合法的 ssl 证书,推荐使用Let’s Encrypt
最后启动 Harbor 套件:
./install.sh好了,目前目前主流的集中镜像存储工具就介绍完了。
总结
你可能会问,我该用哪种来搭建我自己的私有仓库呢?这个要根据自己的需求来:registry 比较简单,需要你自己从零开始搭建;Nexus 是个大而全的方案,维护较为方便,但是比较耗资源;Harbor 确实有一些企业级的特性,通过自动安装脚本简化了部署的过程,但是因为涉及的组件较多,维护成本也较大,而且因为其自己的套件集成了 nginx,所以可能就需要一个单独的机器来跑,不能和自己已有的服务融合起来。所以,我个人比较倾向于使用 Nexus。